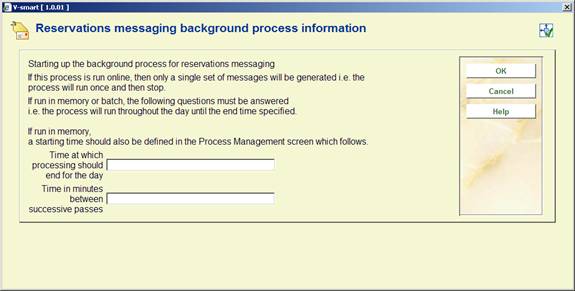
This option allows you to start up the messaging processing job. This processes the reservations, searching through the defined lists for each pickup location, moving reservations through the lists as necessary. After choosing this option an input form will be displayed:
You should enter a time at which the processing should end e.g. “22:00”. In addition, enter a value in minutes for the successive passes (to how often the job should run to check through the reservations).
Note
The processing is quite intensive so, for performance reasons, you should run this as infrequently as possible but commensurate with the sorts of timeout periods you have chosen for your service points.
For example, if you typically allow each service point 3 days in which to respond to a “message”, then it is probably inappropriate to run the background process every 5 minutes!.
After clicking , you are then offered the standard screen for submitting a “process”. Normally you would schedule this in memory. However, you CAN run the process online or in batch. In this case, the processing will run ONCE only, rather than looping indefinitely; and this option would normally be used for testing.
It is possible to assign specific actions to “messages” appearing in the “route exhausted” display (AFO 418). This allows you to define specific actions or statuses to be assigned to messages appearing in the list.
After choosing this option an overview screen will be displayed:

: Select this option to create a new code. See section 618.4.4.1.
: Select a code and then this option to delete it. The system wil prompt for confirmation.
: Select a code and then this option to modify it.
: Select this option to create a new code. An input form will be displayed:
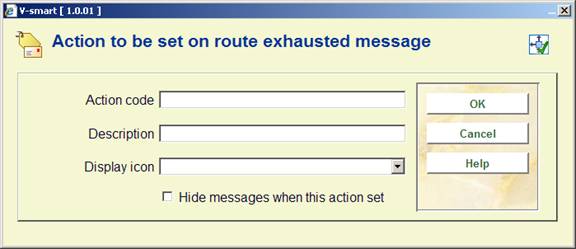
Action code: code to be assigned to this action.
Description: A description of the code.
Display icon: An icon which will appear against the messages in the route exhausted display, when this action is set against the message. This is a drop-down field – the system offers you a choice of about 16 different icons.
Hide message: This tells the system to remove the message from the display when this action is set. For example, when applying a status of “completed”, you might decide to remove this message from the display completely. You should note that the message itself is not deleted from the system – only hidden; by reversing the “hide message” setting, such messages will be made visible again.
This menu option allows the library to specify processing times for specific activities at a service point. There are two aspects of this – SEARCH times to find the item, and subsequent POSTSEARCH processing times.
These settings are independently defined and then linked to specific service points.
After selecting this menu option, an overview screen will be displayed:

: use this option to add a new pattern. See section 618.5.1.1 for details.
: select a line and then this option to view or modify the information. See section 618.5.1.1 for details.
: select a line and then this option to delete the pattern. The system will prompt for confirmation.
: use this to show service points linked to a specific pattern. This display is identical to the Service point listing, except only those service points linked to the selected pattern are shown.
After selecting the or option, an input form will be displayed with four tabs:

This contains the unique code and the descriptive text of the pattern.
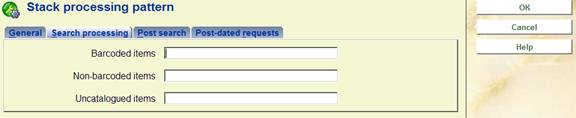
This tab defines the time to process an item. A distinction can be made between items with barcodes (e.g. regular monographs), those without (e.g., typically, serial parts) or those where the requesting reader has entered the bibliographic details manually, which typically might take longer to establish where it is to be found.

This tab defines processing periods. A default setting may be assigned, or a distinction may be made for the time required to deliver an item as compared to returning it to the shelves. (For example, it may be that new requests are prioritised, whilst returning items are “batched” up and reshelved at the end of the day).
In each case, a processing calendar CAN be defined to define when this takes place – if not allocated then the service point's calendar will be used.

This tab relates to the handling of post-dated requests. For a post-dated request, we are trying to establish for how long the item will be unavailable for other requestors. Of course, this is virtually impossible to predict – for example, if the item needs to be shipped from the stack location to satisfy the request then it will take much longer than if the item happens to be already in use at the reading room.
There is not much difference in the workflow between placing a “reservation” on the item and a post-dated request.
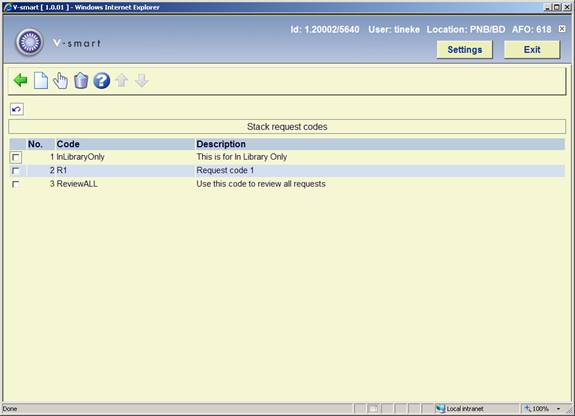
The Stack request code allows some general options to be entered to define slightly different “flavours” of request processing, as a function of the borrower category.
These codes are linked to borrower categories (via AFO 481 – Miscellaneous – Stack request codes per borrower category) to allow for some variations in processing or library policy according to the type of borrower.
After selecting this menu option, an overview screen will be displayed:
: use this option to add a new code. See section 618.5.2.1 for details.
: select a line and then this option to view or modify the information. See section 618.5.2.1 for details.
: select a line and then this option to delete the code. The system will prompt for confirmation.
After selecting the or option, an input form will be displayed:
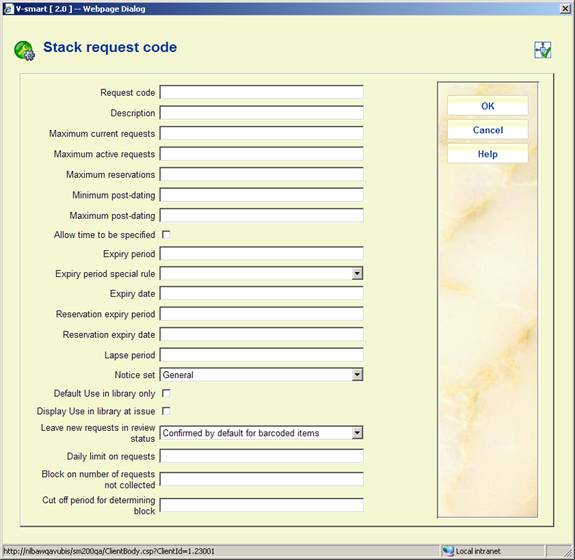
Request code: A unique identifier for the code.
Description: A free text description of the code.
Maximum current requests: Specify the maximum number of requests a borrower can have outstanding at any given time. This applies to both active requestst and reservations.
Maximum active requests: Specify the maximum number of active requests a borrower can have outstanding at any given time.
Maximum reservations: Specify the maximum number of reservations a borrower can have outstanding at any given time.
Notes
If Maximum current requests is set to 10, and Maximum active requests and Maximum reservations to 5 each, this would work OK.
Say the borrower has reached the full maximum. At some point, one of the reserved items may be trapped for the borrower and then become “active”. They would therefore have 6 active items and 4 reservations; the system will not prevent this; but would, of course, continue to prevent them from creating new requests. In other words, these settings only apply at the specific moment that the borrower attempts to request another title.
If Maximum current requests is set to 8 and Maximum active requests and Maximum reservations to 5 each, this is interpreted as meaning that they can have up to 5 active, 5 reservations but no more than 8 in total.
Minimum post-dating and Maximum post-dating: These define how far in advance a post-dated request may be entered, or conversely a minimum period, in days.
Allow time to be specified: Whether a reader can specify a specific time required.
Expiry period and Expiry date: The point at which a request is considered to have expired. This can be set to a number of days, hours or minutes. A specific DATE can also be set.
Expiry period special rule: In some situations, it is necessary to be more precise about the request expiry period. For example, the library may allow a borrower to place a request for an available item in the morning, and expect them to collect the book by the evening (let's say 18:00 that day).
In this situation, if the item is NOT collected by that time, the request is considered to be expired and the work is available for another borrower to request, with the implication that they can collect the book more or less immediately.The expiry date and time is therefore particularly significant in this situation. In order to allow the date and time to be calculated precisely, you can define special rules in AFO 815, which can then be linked here.
Reservation expiry period and Reservation expiry date: The point at which a reservation is considered to have expired. This can be set to a number of days, hours or minutes. A specific DATE can also be set.
Lapse period: This field is used to determine for how long the item is held on the reservation shelf for the requesting borrower to come and collect it.
For a regular request (i.e. for a title that was available immediately) the Lapse date and time will be set to the Expiry date; however for a reservation, the LAPSE period defined here will be used.
Notice set: Select a notice set from the dropdown list if requried. See section 618.5.3 for details.
Default Use in library only: When this option is checked the default value for this type of request is “use in library only”.
Display Use in library at issue: When this option is checked the system will pop up a warning message for “use in library only” when the item is issued.
Leave new request in review status: This is used in conjunction with borrower self-registration via the WebOpac. The idea is that self-registered borrowers will normally have a special borrower category – this can then be linked to a Stack Request code with this option set to "Never confirmed" – which means all requests entered will therefore be set to pending until staff have been able to review them.
Setting this option to "Confirmed by default for barcoded items" means requests for barcoded items are processed in the normal way (not set to Pending).
Setting this option to “Always confirmed” means that any request, even for non-catalogued items, is created as “Confirmed” – this means that it WILL get printed, and never appear in the “Pending” display. If this is used, then requests for borrowers linked to this code can NEVER be set to pending.
Daily limit on requests: This option allows to set a limit per day on requests placed by or for borrowers linked to this code.
Block on number of requests not collected: If a borrower fails to collect requested items, then the system will create a “block” (in the usual way) against their record. This block will ONLY apply to the ability to place stack requests.
Cut off period for determining block: This determines the period in which the number of occurences must appear for the block to be applied.
Example: if the number is set to 10 and the period to 730, then the block will be applied as soon as they have missed collecting 10 items within a 2 year period.
A “notice set” basically defines the layouts of a set of related notices. There are two types of notice set in the context of stack request maintenance – notices which are to be sent to a borrower, and independently the actual printed stack requests themselves (with possibly slightly different characteristics dependent on the context in which the notice is needed to be printed, explained below).
Stack request notices are “attached” to the service point setting – i.e. the layout can be (but need not necessarily be) defined slightly differently for each relevant service point.
After selecting this menu option, an overview screen will be displayed:

: use this option to add a new set. See section 618.5.3.1 for details.
: select a line and then this option to view or modify the details. See section 618.5.3.2 for details.
: select a line and then this option to delete the set. The system will prompt for confirmation.
: select a line and then this option to view or modify the general information. See section 618.5.3.1 for details.
: select a line and then this option to create a new notice set based on information in the selected record.
: use this to set the notice types to be used and their wording. See section 618.5.3.3 for details.
After selecting the or option, an input form will be displayed:

Here you can enter or modify the unique ID and descriptive wording for the set.
When creating a new set, you must next use the option to add the actual documents etc.
After selecting the option, an overview screen will be displayed:

For Stack request, we have the following printed or emailed outputs :
1. Stack request – printed
2. Stack request – reprinted
3. Stack request – post-dated
4. Stack request – for use when item put into transit between reading rooms
5. Stack request – when item held back at the reading room
6. Stack request batch print slips – define the layout of a print of the contents of a batched set of requests.
The layout of these is defined by specifying the full name of a Word (or similar) mailmerge master document. The “notice set” is therefore the list of the names of the master documents for each of the required outputs.
Since the layouts may vary according to the location at which they are required, it is possible to define any number of “Notice Sets” – which are then linked to the relevant service point. Typically there would be only 1 such set for most institutions.
The notice set for reader notices is linked to the Stack request code – and indirectly therefore to the reader category. The wording of the following notice types can be tailored therefore to the type of reader, or specific types of notice may be suppressed.
For example, the wording might be different when addressed to an organisation rather than an individual.
It is NOT necessary to define a layout for each reader category – the notice set definition can be shared by many or all categories).
Reader notices available are
· Request available
· Request available (Reservation)
· Request cancelled
· General message
· Acknowledgement
: when selecting a line, an input form will be displayed:

This is used to to define the full path and document name of the Main document. It is possible but not necessary to define a separate main document for the Email notice. Also the Email subject can be defined here. The “paper size” field is used by the inter library loan module and not relevant here.
Save OutputSets allows each notice to always be saved as a particular file. The storage place is defined in the ini file for the print processor that will output the notice. See the help on mail merge (in AFO 483) for more information.
: This allows a separate main document/template to be defined for different contact languages. This is optional – but it allows for the fixed texts of a notice (or indeed the whole notice layout) to be changed according to the contact language of the user for whom the notice is destined.
After selecting this option an input form will be displayed:

After selecting a language, a screen similar to the main screen will be displayed (see above for an explanation). The current language will be displayed in the header of the screen:
![]()
: use this to set the notice types to be used and their wording. An overview screen will be displayed:

: after selecting a line an input form will be displayed for the wording in different languages:
: after selecting this option a form will be displayed where notices can be (de-) activated and set in a certain order.

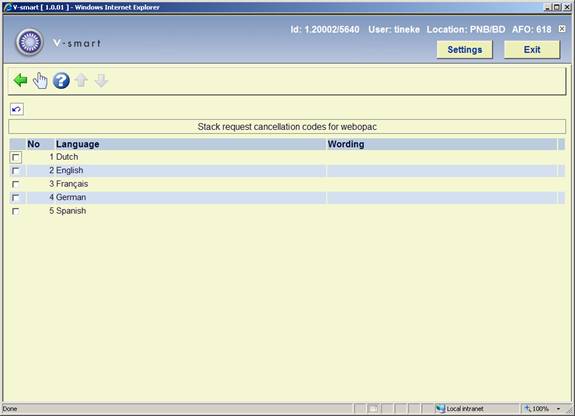
These are codes to be applied when a request is cancelled or temporarily suspended. Apart from being useful for statistical purposes, they also define the texts which will appear on reader notifications of these events.
Please note
These settings are meta institution specific.
At least one code should be entered to cater for the reader wishing to cancel the request for their own reasons – this is set in the “General options” (in AFO 815) to be set automatically by the reader cancellation processing from the WebOPAC.
After selecting this menu option, an overview screen will be displayed:
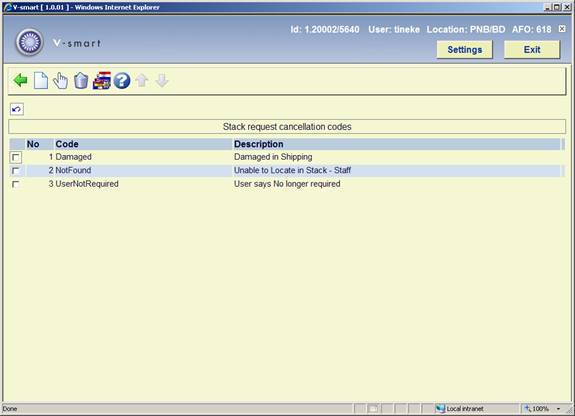
: use this option to add a new code. See section 618.5.4.1 for details.
: select a line and then this option to view or modify the general information. See section 618.5.4.1 for details.
: select a line and then this option to delete the code. The system will prompt for confirmation.
: Select a line and then this option to add a description in various languages. See section 618.5.4.2 for details.
After selecting the or option, an input form will be displayed:
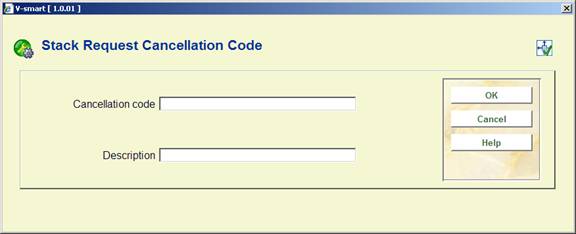
Here you can enter or modify the unique ID and descriptive wording for the cancellation code.
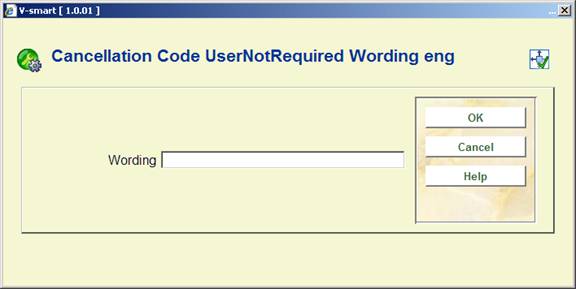
: Select a line and then this option to add a description in various languages. An overview screen will be displayed:
Select a line, an input form for the wording in the selected language will be displayed:
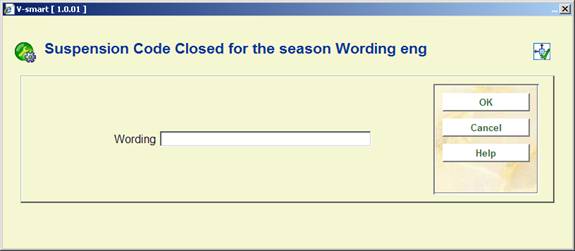
This setting simply associates some wording with a code which can be applied when a route has been suspended. Appropriate wording may be defined for the staff side, and also for use for each possible language in the WebOPAC.
After selecting this menu option an overview screen will be displayed:

: Use this option to add a new code. An input form will be displayed:

Description is purely as description for the maintenance of the code. The actual texts displayed come from the option .
Prevent requests being placed for this suspension code: When this option is checked it means that if the route the code is applied to is (temporarily) suspended, requests can not be placed.
: Select a line and then this option to view/modify the description of the code.
: Select a code and then this option to delete it. The system wil prompt for confirmation.
: Select a line and then this option to add a description in various languages. An overview screen will be displayed:

Select a line, an input form for the wording in the selected language will be displayed:
This option allows you to temporarily suspend parts of a service point. Sometimes, for a limited period, parts of a stack cannot deliver documents; this may be a subset of a route - so with this option you can define shelfmark ranges for which requests are suspended.
After selecting this menu option an overview screen will be displayed:

: Use this option to add a new code. An input form will be displayed:

Select a Location from the dropdown list. Add a sublocation and/or a shelfmark range.
: Select a line and then this option to view/modify the details of the code. An input form like the one described above will be displayed.
: Select a code and then this option to delete it. The system wil prompt for confirmation.
This option allows the library to define the maximum length of a reservation queue according to the category of the item being requested.
These parameters are set separately for each SERVICE POINT. The name of the service point is displayed at the top of the form.
After choosing this menu option a selection form will be displayed:

Select a service point and click , an input form will be displayed:
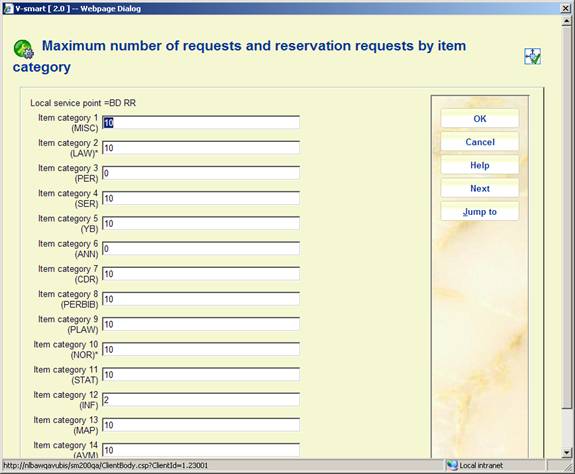
· For each item category enter a maximum if required and click .
When placing a request against an item, the system checks this maximum against the number of requests queued against the item. The setting used is determined for the service point against which the request is being placed.
This maximum INCLUDES the currently active request (if there is one, of course), so setting this value to 0, effectively precludes the item from being requested. Setting it to 1 would prevent any reservations being placed on such items, but would allow a request to be placed if the item is available.
A ‘currently active' request is one for which the item is being processed (e.g. retrieved from the stacks) or for which the item is actually on loan. In the unusual event that an item, which is normally expected to be ‘requested', has been directly loaned to a borrower, then there is no ‘currently active” request, and so is NOT counted in the limit above.
From the Staff side, if placing the request would take the number of requests above the maximum, then a warning is shown, but staff CAN override the warning.
From the WebOPAC, the option to request the item will NOT be suppressed BUT the borrower will then be told that the queue of requests for this title is too great. (If the maximum is set to 0 explicitly, then the option will be suppressed – this is a slightly different circumstance).
In addition, the wording offered when the limit is 1 (i.e. reservations are not allowed) can be set differently from the wording when the limit is >1. (In other words, there is a fundamental difference between ‘reservations are not allowed' and “there are too many reservations right now”.
· In case there are more than 15 item categories, there will be a button to go to the next screen.
· The button allows you to go directly to a specific item category.
Note
If you select a service point of type “Delivery”, the system will warn you that you need not define anything for this type of service point.
· Document control - Change History
|
Version |
Date |
Change description |
Author |
|
1.0 |
June 2008 |
creation |
|
|
1.1 |
August 2008 |
major additions for Stack requests |
|
|
1.2 |
October 2008 |
further additions for Stack requests; Part of 2.0 updates |
|
|
2.0 |
April 2010 |
new options for Stack requests |
|